
Quick Guide: How to Change Your WiFi Channel
Follow these quick steps to change your WiFi channel, resolve network interference, and boost connection speeds. For enterprise-grade networks, skip directly to the Cisco Meraki , Aruba Central , Ruckus/UniFi , or Mist AI sections.
- Log into your router: Open a web browser, enter your router's IP address (typically
192.168.1.1or192.168.0.1), and log in. - Navigate to Wireless Settings: Locate the "Wireless", "WLAN", or "Radio" configuration menu in the administration interface.
- Select the frequency band: Choose either the 2.4 GHz or 5 GHz band settings depending on which one you want to optimize.
- Change the channel: Switch the channel setting from "Auto" to a specific non-overlapping channel (use 1, 6, or 11 for 2.4 GHz; use 36, 40, 44, or 48 for 5 GHz).
- Save and reboot: Click "Save" or "Apply", and let your router reboot to apply the clean, new channel settings.
To change your WiFi channel, you generally need to log into your router's admin panel through a web browser. From there, you'll look for 'Wireless' or 'WLAN' settings and pick a new channel from a dropdown menu for the 2.4GHz or 5GHz band. Once you save the setting, your router will likely reboot and apply the change, which can often lead to an instant performance boost by sidestepping interference.
Why Your WiFi Channel Matters More Than You Think

Picture your WiFi network as a conversation. If you're in a quiet room, hearing every word is effortless. But try having that same conversation in a packed café, and you’re suddenly competing with dozens of other voices, all shouting to be heard. This is precisely what happens to your WiFi signal in a congested area.
Every router nearby is broadcasting on a specific frequency, or "channel". When too many networks are crammed onto the same or overlapping channels, they create a cacophony of radio frequency (RF) interference. This digital "noise" forces your devices to constantly wait for a gap in the chatter, leading to infuriatingly slow speeds, buffering video calls, and connections that drop for no apparent reason.
Understanding Interference and Congestion
In densely populated areas across the UK - from multi-tenant office buildings in London to bustling retail centres in Manchester - the airwaves are absolutely saturated. Your router, along with every other one nearby, is trying to hold its own conversation in that same overcrowded room. The inevitable result is network congestion, where data packets collide, get delayed, or are lost completely.
Learning how to change your WiFi channel is like finding a quieter corner of that room for your network's conversation. By selecting a less crowded channel, you can slash interference and finally unlock the performance you're paying for. This isn't just a nice-to-have; in commercial environments, it's non-negotiable.
For a business, a stable WiFi connection isn't a perk; it's a core operational tool. Poor connectivity can disrupt point-of-sale systems, hamstring staff productivity, and create negative customer experiences that directly hit your bottom line.
The Impact on User Experience
This goes far beyond just getting faster downloads. A well-chosen WiFi channel delivers a stable, low-latency connection, which is vital for modern business operations.
For hospitality venues using Purple to provide secure, passwordless guest access, a clean channel means visitors connect smoothly every single time. For retailers, it ensures that location analytics and customer engagement tools operate without a hitch.
Making a strategic channel change can lead to:
- Faster Speeds: Less interference means higher data throughput for every connected device.
- Greater Reliability: Your connection will be far less prone to random dropouts and disconnects.
- Improved User Satisfaction: A smooth online experience keeps customers and staff happy, productive, and engaged.
Finding the Best WiFi Channel in Your Environment

Before you touch a single setting, you need to put on your detective hat. Blindly switching channels is like trying to find your way around a new city without a map - you might get lucky, but you're far more likely to end up in a worse spot. The first, and most critical, step is to get a clear picture of your local radio frequency (RF) environment with a site survey or spectrum analysis.
This process uses specialised tools to visualise all the WiFi networks operating around you, showing you exactly which channels are jam-packed and which ones are clear for take-off. For enterprise-grade networks, this kind of functionality is often built right into the management dashboard. Platforms like Meraki, Aruba, and UniFi have powerful RF scanning tools that continuously monitor the airwaves, serving up real-time data on channel use and interference.
Analysing Your Local Airwaves
For smaller setups or just a quick spot-check on the ground, plenty of third-party apps can turn a laptop or mobile phone into a perfectly capable WiFi analyser. These tools scan for nearby networks and present the information in an easy-to-read graph, showing you which channels are in use and just how loud their signals are.
When you're looking at the results, you're hunting for two key metrics:
- Signal Strength (RSSI): Measured in negative decibels (-dBm), this tells you how "loud" another network is. A signal at -50dBm is very strong and probably next door, while one at -90dBm is barely a whisper.
- Channel Congestion: Look closely at how many other networks are piled onto a single channel. This is absolutely vital in the notoriously crowded 2.4GHz band.
Getting a handle on the local RF landscape means you can make an informed decision, not a wild guess. For more complex spaces, you might want to learn more about planning your access point layout with our handy AP calculator .
Decoding 2.4GHz vs 5GHz Scans
Looking at the 2.4GHz and 5GHz bands requires two different mindsets. The 2.4GHz band is a mess, and it’s not just other WiFi networks causing the chaos. You're competing with Bluetooth devices, microwave ovens, and even old cordless phones. When you scan this band, expect to see a lot of overlap and interference.
Your goal in the 2.4GHz band is damage control. You're not looking for a perfectly empty channel - you're looking for the least congested one to provide a baseline of stable connectivity for older devices.
On the other hand, the 5GHz band offers a whole lot more channels and is generally a much cleaner space. A scan here will reveal more open territory, giving you much more flexibility. In the 5GHz world, you’re not just dodging interference; you're strategically picking channels and channel widths to squeeze every last drop of performance out for your critical applications.
This data-driven approach turns channel selection from a guessing game into a precise network optimisation task. It’s the foundation for any reliable, high-performing wireless network.
Strategic Channel Planning for 2.4GHz and 5GHz Bands
Once you’ve had a good look at your local airwaves, it's time to put together a smart channel plan. This isn't just about grabbing the first empty slot you see. It's about really understanding the massive differences between the 2.4GHz and 5GHz bands and making choices that actually support what your business needs. In any professional network design, these two bands are treated as tools for very different jobs.
Think of the 2.4GHz band as a narrow, perpetually congested A-road. It's crowded with traffic, moves slowly, but the signal goes on for miles. Because of this, your main strategy here is really about damage control.
The Non-Negotiable 2.4GHz Channels
In the UK and Europe, you technically have 13 channels in the 2.4GHz spectrum, but that's a bit of a red herring. The catch is that most of these channels bleed into one another, creating a mess of interference. Imagine lanes on that A-road that aren't marked properly - cars would be constantly clipping each other's mirrors.
To avoid this "adjacent channel interference", your only sensible options are channels 1, 6, and 11. These are the only three that are spaced far enough apart not to overlap, giving your devices a clear path to communicate. Sticking to this trio is one of the foundational best practices for a stable WiFi network.
For places like multi-tenant buildings or busy high-street shops, a coordinated plan using only channels 1, 6, and 11 across all your access points is absolutely essential. This stops your own APs from shouting over each other and frees up the airtime for what matters: your customers' and staff's data. You can get deeper into this in our guide to designing high-density WiFi networks .
Unlocking Performance with 5GHz
If 2.4GHz is the congested A-road, the 5GHz band is your multi-lane, high-speed motorway. It offers a huge number of channels and suffers from far less interference, making it the go-to for anything that needs real performance. But with more options comes a bit more complexity, especially when we start talking about channel width.
You can configure 5GHz channels to be wider, almost like combining lanes on the motorway, to push more data through at once and boost your speeds:
- 20MHz: This is your standard, baseline width. It's the least likely to pick up interference but offers standard speeds.
- 40MHz: This bonds two 20MHz channels together. You can double your potential speed, but you also double the chances of hitting interference.
- 80MHz: Here you're bonding four channels. It offers seriously fast speeds but is incredibly sensitive to interference. You'd only want to use this in an environment with almost no other radio noise.
For most businesses, sticking with 20MHz or 40MHz channels hits the sweet spot between speed and reliability. Wider channels are often best left for the automatic radio management systems on modern APs, which can adapt on the fly if the airwaves get too busy.
Before diving into a full channel plan, it's helpful to see the key differences between the two bands side-by-side.
2.4GHz vs 5GHz Channel Planning Comparison
Ultimately, a balanced network uses both bands for what they're good at. The 5GHz band should be your workhorse for performance, while 2.4GHz provides a reliable fallback for older devices or areas where the 5GHz signal can't quite reach.
Navigating Dynamic Frequency Selection (DFS)
There's another set of channels in the 5GHz band known as DFS channels. These frequencies have historically been reserved for things like weather and military radar. While using them opens up a huge amount of extra space for your WiFi, it comes with a major string attached: if an access point detects a radar signal, it is legally required to immediately stop using that channel and move elsewhere.
For your users, this can mean a brief, unexpected connection drop, which might not be a big deal for someone browsing the web but could be a disaster for a payment terminal processing a transaction or a VoIP phone call.
That said, in many locations, actual radar events are incredibly rare, and the benefit of having all those extra channels is massive. A proper site survey is the only way to know for sure if DFS channels are a safe bet in your specific area.
In the UK, where full-fibre broadband now reaches 78% of homes, having an effective channel management strategy is vital for businesses to cut through the residential noise. Purple's data from UK retail spaces shows that a simple switch to a less congested channel, like 11, can increase throughput by up to 40% during peak hours, ensuring customers have a smooth experience. You can find out more about the UK's connectivity landscape on ComputerWeekly.com .
How to Change Your WiFi Channel on Leading Network Gear
Alright, you've done the groundwork - surveyed your airspace and sketched out a channel plan. Now it's time to put that plan into action. Moving from theory to practice means getting your hands dirty in the dashboards of your network gear. While your home router might tuck these settings away, enterprise-grade systems give you the granular control you need over the radio frequency (RF) environment.
We'll walk through the process on the most common platforms you're likely to come across. The goal is to make smart, informed tweaks, whether you're locking down channels manually for predictable performance or just nudging the automatic systems to behave better in a dynamic space.
Navigating Cisco Meraki
Meraki's cloud dashboard is famous for its clean, user-friendly interface. To get to the channel settings, you'll need to head over to the Wireless > Radio settings page. This is where you'll find the configuration options for both your 2.4GHz and 5GHz radios.
You've got two main paths you can take here:
- Manual Assignment: You can pin a specific channel and transmission power level to each individual access point. This is perfect for high-density venues where you've meticulously mapped out a channel plan to stamp out co-channel interference.
- Auto Channel: Meraki's Auto RF feature can handle the channel assignments for you. The clever part is you can guide its decisions by telling it to avoid certain channels (like DFS channels if you're near an airport or weather radar).
This decision tree is a great visual aid for figuring out which frequency band to focus on when you're making these changes.
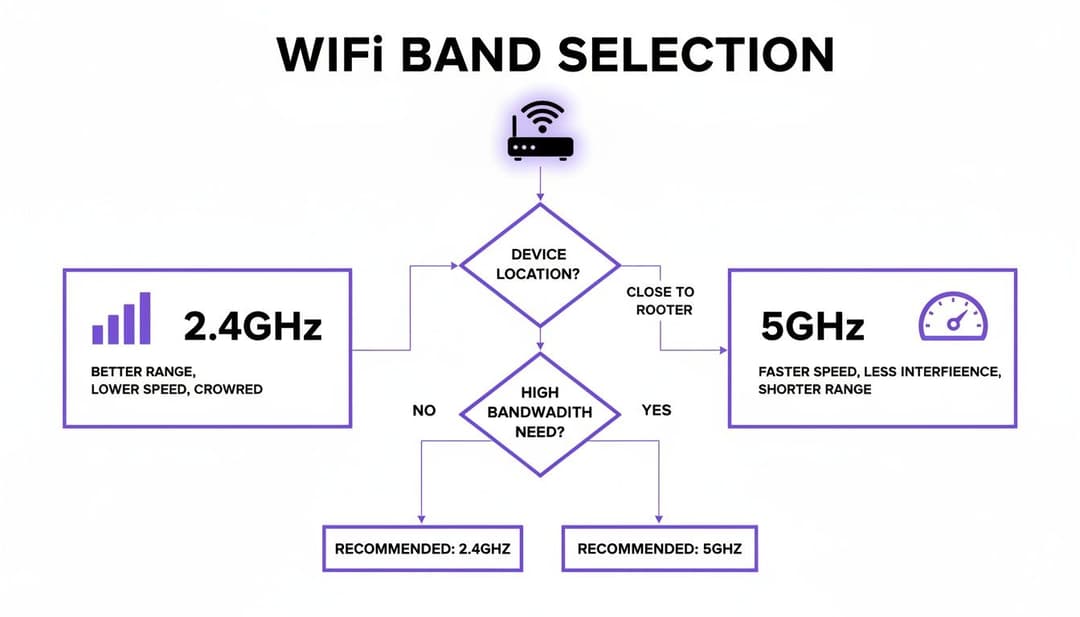
As the flowchart shows, the 5GHz band is the undisputed champion for anything that needs speed. Meanwhile, 2.4GHz is the reliable workhorse for devices where range is more important than raw performance.
Managing Channels in Aruba Central
If you're managing your network with Aruba Central , the process feels just as streamlined, though the terminology is a bit different. You'll need to navigate to the group of access points you want to configure, then find your way to Devices > Access Points > Config > Radios. This is the command centre for Aruba's RF management.
Aruba’s Adaptive Radio Management (ARM) is its powerful, automatic optimisation engine. You can absolutely let ARM take the wheel and handle everything, or you can step in to give it some direction. For example, you can set a list of preferred channels or define minimum and maximum power levels. This constrains ARM's choices, giving you a nice balance between full automation and manual control.
For businesses in sectors like healthcare and transport, where rock-solid reliability is non-negotiable, interference on default channels can slash performance by 30-50% in crowded areas. A network admin using Aruba Central in a busy city like Canterbury might see a scan showing channel 1 is 80% saturated. A simple manual switch to channel 11 could deliver a 25-45% speed boost for critical staff devices - a massive win for daily operations. You can dig into more UK broadband trends in these detailed broadband statistics .
Adjusting RF Settings in Ruckus and UniFi
While every platform has its own unique flavour, the core ideas are pretty much the same across the board.
Ruckus SmartZone: If you're a Ruckus user, you'll be working with ChannelFly and Background Scanning. Within a specific Zone's configuration, you can switch these features on and let the system figure out the best channels on its own. For those moments when you need manual control, you can override ChannelFly on a per-AP basis right in the individual access point's settings.
Ubiquiti UniFi: The UniFi Network Application offers both site-wide and device-specific controls. Under Settings > WiFi, you can set up Global AP Settings to manage channels automatically. But if you need to intervene directly, just pick an access point from the Devices list, go to its Settings > Radios, and you can manually set the channel and channel width for both the 2.4GHz and 5GHz bands.
Pro Tip: When you're making manual changes, always adjust one access point at a time. Let it run for a few hours - or even a full day - to make sure the change has had the positive effect you were looking for. Only then should you roll it out across the rest of your network. This simple step can save you from a massive headache if a change introduces an unexpected problem.
Configuring Mist AI
Mist brings a modern, AI-driven approach to the table with its Radio Resource Management (RRM). From the Mist AI dashboard, head to Network > WLANs to review your radio settings. Mist's engine is constantly crunching RF data to make predictive, proactive channel changes, all aimed at optimising the user experience.
While Mist's AI is incredibly effective, you're not just a passenger. You can create an RF Template under Organisation > RF Templates to lay down the law about your preferred channels, bandwidths, and power levels. Applying this template to your site tells the AI engine to work within your rules, giving you a powerful hybrid approach to channel management.
Monitoring Performance and Troubleshooting After a Channel Change
Flicking the switch on a new WiFi channel isn't the finish line. Far from it. The real work begins now, making sure your change actually improved things rather than just moving the problem elsewhere. This is where you shift from active planner to diligent observer, keeping a close eye on key performance indicators (KPIs) to see the real-world impact.
Don't be tempted to just run a single speed test and call it a day. To get the full picture, you need to track several metrics over a few days to build a new performance baseline. This is where a proper analytics platform really earns its keep, turning raw data into clear, actionable insights about the end-user experience.
Key Performance Indicators to Watch
Once you've made the change, start tracking these critical metrics. Together, they paint a complete picture of your network's health and will tell you pretty quickly if your new channel is a winner or a dud.
- Throughput: This one’s the most obvious. Are your users getting faster, more consistent download and upload speeds? Pay close attention to peak usage times.
- Latency (Ping): Lower latency is absolutely vital for anything real-time, like video calls or online gaming. Seeing a drop from 50ms down to 20ms is a massive improvement.
- Retransmission Rate: Often called the "retry rate", this metric shows how often data packets have to be resent due to interference or corruption. A high rate points to a noisy, congested channel; you want to see this number fall dramatically.
- User-Reported Satisfaction: Hard data is crucial, but don't forget the human element. Check in with your staff or regular visitors. Are they noticing fewer dropouts or less buffering?
The ultimate goal is to connect your technical tweaks to tangible business outcomes. A successful channel change should mean fewer support tickets, smoother point-of-sale transactions, and a better digital experience for everyone in your venue.
Common Troubleshooting Scenarios
Every now and then, a channel change can have unintended side effects. If performance actually gets worse, don't panic. The usual suspect is intermittent interference from non-WiFi sources. Things like microwave ovens, Bluetooth speakers, or even old security cameras can pollute your supposedly "clean" new channel at completely unpredictable times.
If you suspect this is the culprit, try moving to another of the non-overlapping channels (for example, from channel 11 to 1 on the 2.4GHz band) and start the monitoring process again. Of course, sometimes persistent connectivity issues have nothing to do with channel choice. For a deeper dive, you might find our guide on why your WiFi keeps disconnecting useful. This cycle of testing, monitoring, and adjusting is the very heart of effective network management.
Frequently Asked Questions About WiFi Channel Management
Even with the best plan in hand, questions always come up when you start tweaking WiFi channels in a live environment. Getting straight answers is key to building the confidence you need to manage your network effectively, turning abstract theory into practical, real-world solutions. Let's tackle some of the most common queries we hear from network admins and venue operators.
Should I Use Automatic or Manual Channel Selection?
For most small to medium-sized setups, the automatic or adaptive channel selection on modern access points does a surprisingly good job. These systems are constantly sniffing the airwaves and adjusting channels on the fly to dodge interference, keeping things running smoothly without you having to lift a finger.
However, once you get into high-density or complex RF environments - think stadiums, sprawling hotels, or multi-tenant buildings - a manual channel plan is almost always superior. A plan built from a thorough site survey prevents the frequent, sometimes disruptive channel hops that automated systems can trigger. This manual control gives you a stable, predictable network that won’t suddenly change its mind in the middle of a busy day.
In dynamic spaces where your neighbours' networks are constantly appearing and disappearing, a hybrid approach often works best. Let the automatic system do its thing, but rein it in by excluding certain channels (like problematic DFS ones) to get the best of both worlds: stability and adaptability.
How Often Should I Change My WiFi Channels?
Honestly, you shouldn't need to change them very often at all. The goal is to do a detailed analysis upfront, create a solid channel plan based on that data, and then set it and forget it. If you find yourself constantly tinkering, it’s usually a symptom of a deeper problem.
You should only really revisit your channel plan if you notice a significant, sustained drop in performance, get a sudden spike in user complaints, or make major changes to the building itself (like putting up new walls or installing large metal equipment). Proactive monitoring is crucial here; review your network performance metrics quarterly, but only step in to change channels when the data points to a persistent issue.
Can Changing My WiFi Channel Improve Security?
Changing your WiFi channel won't directly boost its cryptographic security. The real protection for your network comes from your encryption protocol (like WPA3), your authentication method, and your network isolation policies - not the frequency it's broadcast on.
That said, a well-managed channel plan absolutely enhances operational security and reliability. By cutting down on interference and packet loss, you're making sure that security-critical applications can run without frustrating connection drops. For instance, certificate-based authentication through Purple with Entra ID depends on a stable connection to work flawlessly. A clean, clear channel ensures this process is not just secure, but consistently reliable for every single user.
Ready to deliver a seamless, secure WiFi experience without the hassle of passwords? Purple integrates with your existing network gear to provide passwordless access for guests and staff, turning first-party data into insights that boost loyalty and prove ROI. Discover how Purple can transform your venue's connectivity .